WSL2 快速配置 封面来源:@sasamik_
因为近期又重复配 wsl2,干脆自己给自己列一下常见操作。
Windows功能 开启虚拟化相关设置:Hyper-V, 适用于 Linux 的 Windows 子系统等,BIOS 打开虚拟化的设置。
重启生效。
注:如果遇到和虚拟化相关的报错(具体报错信息没有留),可能需要更新 wsl 版本,wsl --update。
1
2
3
4
5
# (以管理员打开 powershell 等)
# 启用适用于 Linux 的 Windows 子系统
dism.exe /online /enable-feature /featurename:Microsoft-Windows-Subsystem-Linux /all /norestart
# 启用虚拟化
dism.exe /online /enable-feature /featurename:VirtualMachinePlatform /all /norestart
安装 Linux 内核 1
2
3
4
5
6
7
8
9
10
11
12
13
14
15
16
# 查看本机有的 Linux 发行版
wsl --list
# 查看可安装的发行版
wsl.exe --list --online
# 安装,如 Ubuntu-22.04
wsl --install <DistributionName>
# 设置默认发行版
wsl --set-default <DistributionName>
# 查看 wsl 发行版本
wsl -l --all -v
# 卸载发行版
wsl --unregister <DistributionName>
# wsl 默认版本设置成 wsl2(可选)
# 注意:wsl2 读取挂载 /mnt 的文件,是通过网络通信的(smb协议)
# 不是 wsl1 的 IO,建议运行先转移到 wsl2 运行下
wsl --set-default-version 2
更改 wsl 的存储位置 1
2
3
4
5
6
7
8
9
10
11
12
13
14
15
16
17
# 查看 wsl 发行版本,后续的 Ubuntu-22.04 替换成你的发行版
wsl -l --all -v
# 导出发行版为 tar 到存储位置
# 注意:如果需要像我一样,放在某个文件夹下,需要先自己手动建立文件夹(在此命令下就是 wsl2 文件夹)
wsl --export Ubuntu-22.04 d:\w sl2\u buntu22.04.tar
# 注销当前分发版
wsl --unregister Ubuntu-22.04
# 重新导入,刚刚导出的发行版,并且安装在xxx目录,这里是 d:\wsl2\ubuntu22.04,可以更改
# 如果前面正常设置了,这时遇到导入失败的问题,可以尝试更新 wsl
wsl --import Ubuntu-22.04 d:\w sl2\u buntu22.04 d:\w sl2\u buntu22.04.tar --version 2
# 设置默认登录用户名 sername 自选
ubuntu2204 config --default-user <username>
# 删除导出的 tar 文件(可选)
del d:\w sl2\u buntu22.04.tar
# 设置默认发行版
wsl --set-default <DistributionName>
# 此时,d:\wsl2\ubuntu22.04 就是 wsl 的根目录了
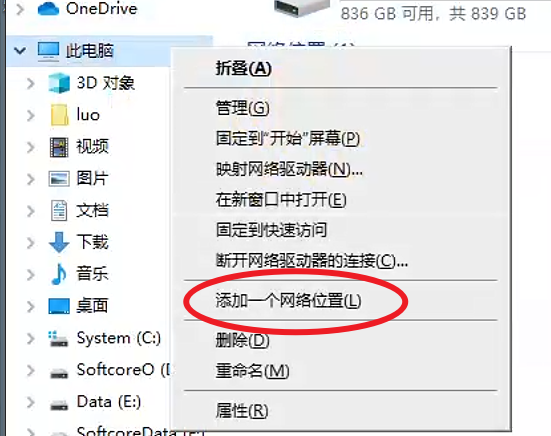
建立网络位置访问 右键此电脑
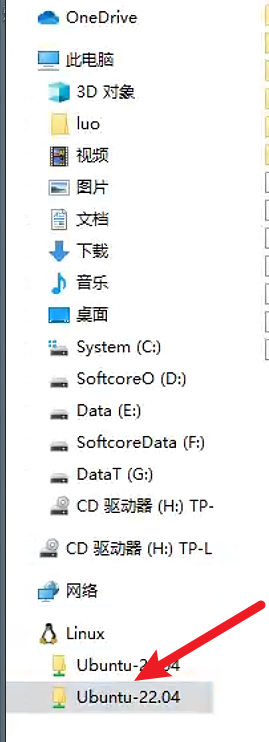
添加类似于\\wsl.localhost\Ubuntu-22.04\home\luo的地址,具体可以在资源管理器 界面的,Linux下访问 wsl 的文件目录,复制下来。
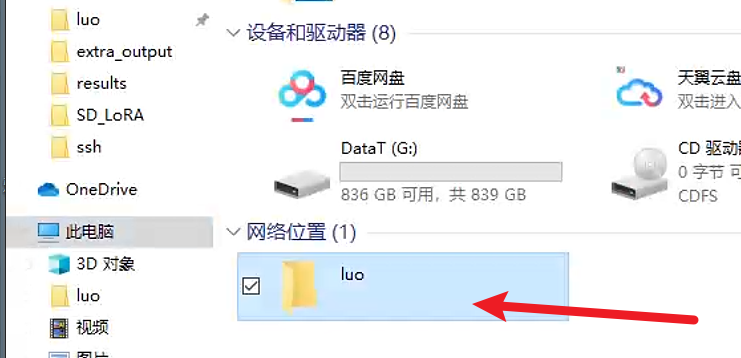
添加后的效果
设置代理 进入 wsl setting 设置 mirror(?)
允许本地局域网请求 Allow LAN 好像就行了
后面的可能不需要(?)
 1
 2
 3
 4
 5
 6
 7
 8
 9
10
11
export http_proxy = http://127.0.0.1:7890
export https_proxy = http://127.0.0.1:7890
# git
git config --global http.proxy http://127.0.0.1:7890
git config --global https.proxy http://127.0.0.1:7890
# windows 端 crlf
git config core.autocrlf false
git config --global core.autocrlf false
git config --system core.autocrlf false
安装常用环境 1
2
3
sudo apt update
sudo apt - get update
sudo apt install gcc g ++
给bash换皮肤(可选) 在 cmd 下的显示效果好像有问题,Powershell 还ok,vscode 的终端部分显示效果较好。
Starship 的 Pastel Powerline Preset
Nerd fonts
Cascadia Mono 。
按照 Starship
1
2
3
4
5
6
7
8
9
10
# 下载 TOML 配置文件(也可以在上面网站上,点击 TOML 的下载链接 或 复制下来创建文件)
wget https://starship.rs/presets/toml/pastel-powerline.toml
# 若没有目标路径,先创建路径,-p 参数用于递归创建,这里可以省略
mkdir -p ~/.config
# 移动到指定路径并改名
mv pastel-powerline.toml ~/.config/starship.toml
# 安装 Starship,这步失败大概率是网络代理配置没配好
curl -sS https://starship.rs/install.sh | sh
# 按照安装成功后,显示的命令行方法,应用,这里给出 bash 的版本
eval " $( starship init bash) "
安装 zsh (可选) 1
2
3
4
5
6
7
8
9
10
11
12
13
14
15
16
17
18
19
20
21
22
23
24
25
26
27
28
29
30
31
32
33
34
35
36
37
38
39
40
41
42
43
44
45
46
47
48
49
50
51
52
# 安装 zsh
sudo apt install zsh
# 设置默认终端为 zsh,不要用 sudo
chsh -s /bin/zsh
# 安装 oh-my-zsh
# curl sh -c "$(curl -fsSL https://install.ohmyz.sh/)"
# wget sh -c "$(wget -O- https://install.ohmyz.sh/)" # 1
# fetch sh -c "$(fetch -o - https://install.ohmyz.sh/)"
# 国内curl镜像 sh -c "$(curl -fsSL https://gitee.com/pocmon/ohmyzsh/raw/master/tools/install.sh)"
# 国内wget镜像 sh -c "$(wget -O- https://gitee.com/pocmon/ohmyzsh/raw/master/tools/install.sh)"
# 主题 powerlevel10k
git clone --depth= 1 https://github.com/romkatv/powerlevel10k.git ${ ZSH_CUSTOM :- $HOME /.oh-my-zsh/custom } /themes/powerlevel10k
# 中国用户可以使用 gitee.com 上的官方镜像加速下载
git clone --depth= 1 https://gitee.com/romkatv/powerlevel10k.git ${ ZSH_CUSTOM :- $HOME /.oh-my-zsh/custom } /themes/powerlevel10k
vim ~/.zshrc
ZSH_THEME = "powerlevel10k/powerlevel10k"
source ~/.zshrc
# 配置
yyy1y1112211111n1
# 内置插件
ls ~/.oh-my-zsh/plugins
# autosuggestions 补全
git clone https://github.com/zsh-users/zsh-autosuggestions ${ ZSH_CUSTOM :- ~/.oh-my-zsh/custom } /plugins/zsh-autosuggestions
# 中国用户可以使用下面任意一个加速下载
# 加速1
git clone https://github.moeyy.xyz/https://github.com/zsh-users/zsh-autosuggestions ${ ZSH_CUSTOM :- ~/.oh-my-zsh/custom } /plugins/zsh-autosuggestions
# 加速2
git clone https://gh.xmly.dev/https://github.com/zsh-users/zsh-autosuggestions ${ ZSH_CUSTOM :- ~/.oh-my-zsh/custom } /plugins/zsh-autosuggestions
# 加速3
git clone https://gh.api.99988866.xyz/https://github.com/zsh-users/zsh-autosuggestions ${ ZSH_CUSTOM :- ~/.oh-my-zsh/custom } /plugins/zsh-autosuggestions
# zsh-syntax-highlighting 语法校验
git clone https://github.com/zsh-users/zsh-syntax-highlighting.git ${ ZSH_CUSTOM :- ~/.oh-my-zsh/custom } /plugins/zsh-syntax-highlighting
# 中国用户可以使用下面任意一个加速下载
# 加速1
git clone https://github.moeyy.xyz/https://github.com/zsh-users/zsh-syntax-highlighting.git ${ ZSH_CUSTOM :- ~/.oh-my-zsh/custom } /plugins/zsh-syntax-highlighting
# 加速2
git clone https://gh.xmly.dev/https://github.com/zsh-users/zsh-syntax-highlighting.git ${ ZSH_CUSTOM :- ~/.oh-my-zsh/custom } /plugins/zsh-syntax-highlighting
# 加速3
git clone https://gh.api.99988866.xyz/https://github.com/zsh-users/zsh-syntax-highlighting.git ${ ZSH_CUSTOM :- ~/.oh-my-zsh/custom } /plugins/zsh-syntax-highlighting
# z 文件夹快捷跳转
z xxx
# extract 解压任何压缩文件
x xx.tar
# web-search 搜索引擎关键字+搜索内容 google baidu bing
# 启用插件
plugins =( git zsh-autosuggestions zsh-syntax-highlighting z extract web-search jsontools)
vim 配置 (可选) 1
2
3
4
5
6
7
8
9
10
11
12
13
14
15
16
17
18
19
20
21
22
23
24
25
26
27
28
29
30
31
32
33
34
35
36
37
38
39
40
# ~/.vimrc
" basic
syntax on
set showmode
set showcmd
set mouse=a
set encoding=utf-8
filetype indent on
" indent
set autoindent
set tabstop = 4
set shiftwidth = 4
set expandtab
set softtabstop = 4
" view
set number
set relativenumber
set cursorline
set textwidth=80
set laststatus=2
set ruler
" search
set hlsearch
" clip
let s:clip = '/mnt/c/Windows/System32/clip.exe' " clip path, depends
if executable( s:clip)
augroup WSLYank
autocmd!
autocmd TextYankPost * if v:event.operator == # 'y' | call system(s:clip, @0) | endif
augroup END
endif
miniconda(可选) https://www.anaconda.com/download/success
1
2
3
wget https://repo.anaconda.com/miniconda/Miniconda3-latest-Linux-x86_64.sh
# chmod 777 ./Miniconda3-latest-Linux-x86_64.sh
./Miniconda3-latest-Linux-x86_64.sh
参考文章 WSL入门到入土 - 知乎
Win10/11下安装WSL并修改WSL默认安装目录到其他盘_wsl 设置目录-CSDN博客
zsh 安装与配置,使用 oh-my-zsh 美化终端 | Leehow的小站